A few Words about PID
PID controllers (Proportional-Integrative-Derivative) are widely used in many industrial processing systems.
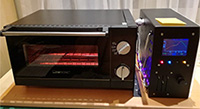
To be able to control the heaters and closely follow the ideal reflow profile, a PID controller has been implemented. Since every PID controller must be tuned to work properly and the
tuning changes for different environments (different ovens) you need to understand some basics on how PID actually works.
PID is based on “
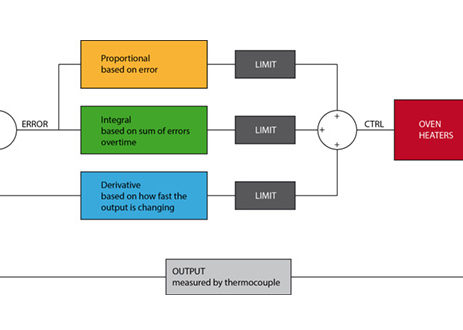
feedback”: at a fixed time frequency the temperature value is read from the sensor (thermocouple) and confronted with the setpoint (ideal targeted temperature).
The error is then used to calculate three variables P, I and D.
The result of the sum of those variable is then used to know how strongly the heaters should be turned on using a sort of “slow PWM” to drive them via the SSR.
It is to be noted that, while in a standard PID algorithms all three components are calculated based only on the error,
to improve the response in our PID we decided to calculate D using the difference from the CURRENT OUTPUT value and the LAST OUTPUT value, following a technique also known as “
Derivative on Measurement”.
Since PID variables may become very large, they are also
limited to a maximum value of +/-999.
Keep in mind anyway that a PID value of
400 (sum of P,I,D)
will turn on the oven constantly, so your values should remain much lower than maximum at any time.
Before proceeding to tuning X-toaster we will need to understand how PID variables change the behavior of the oven
without using complex math and simplifying everything as much as possible: our goal is to be able to
understand enough of the matter to be able to tune it.
For a more precise and complete analysis you can read some of the many articles around the web or you can refer to some academic literature on Controls System and Automation.
Proportional Term
This is the easier to understand. You simply have to
multiply a Kp constant with the measured error at any given time.
Try imaging when you are driving a car and you want to reach a steady and fixed speed: at the start you would press your foot on the pedal with a large intensity (large error). While the speed increases over time (the error gets smaller) you surely will decrease the pressure on the pedal to have more control. You are simply using a P control. Kp tells you how strongly you have to react to errors by pressing the gas pedal more or less aggressively. When you start your car you never press your pedal all the way down:
tuning P means searching a value for Kp large enough to let the speed rise quickly but not so much that you will reach a point where the car becomes uncontrollable.
In our oven the main problem with large Kp values are big overshoots because of thermal inertia. In the car example temperature would be more the road traveled than the velocity: if you want to reach a certain distance, even by releasing the gas pedal your car is still travelling because of its inertia:
by reducing your Kp the car is more controllable because changes are slower.
Integral Term
The main problem in using only a P term is that,
when you reach the target speed in the previous example the error become zero. By definition then, you will instantly and completely release the gas pedal (remember that with P you are simply multiplying the error by a constant Kp). As soon as you release the pedal the car starts to decelerate, the error changes and you will press the pedal again.
Of course this is not how people drive because by doing this you are introducing a bad oscillation on your car speed.
The integral term helps in removing steady state errors. Let’s see how it can help with our speed problem.
I is calculated by multiplying a Ki constant with the sum of all the errors measured during time (if you draw a graph for the "error function", I will be the area under the graph itself, hence “integrative”).
You can easily see that
I will increase over time, while there is an error, and
will become a fixed value when the error becomes zero.
Well, this is exactly what we needed with our car: when you reach targeted speed, the error becomes zero.
You still have a P term equals to zero but an I term which is not zero so you are not going to release the pedal but, depending on how big is your Ki constant, you will keep on pressing the pedal at a bigger or smaller angle.
Tuning I means searching the Ki constant which allows you to have a pressure just right to maintain the speed.
Derivative Term
We have seen that
when the speed changes too fast your car is difficult to control.
By using lower Kp values you can improve things a little bit, but everything is less reactive and travelling a certain distance would require too much time.
We need a way to
keep reaction fast but to counteract changes too big to handle.
In our PID version, D is the difference between the output value and the previous output value, divided by the time between the two measurements and multiplied by a constant Kd.
If you can visualize it in a graph you can easily recognize it as the derivate of the output function over time (supposing a very small interval between measurements): it tells us
how big is the slope of the tangent line to the "output function" for every single moment hence how fast the output is changing.
Well, this is exactly what we needed:
when the output function is rising D is negative, when it is falling D is positive, when the output function rises or falls gently D becomes almost zero, when there are fast changes D becomes very large.
In our car example, at the start when the error is large the controller tells us to press heavily on the pedal. If the speed is not changing quickly we will keep on pressing the pedal but if the car starts moving at high speed we will instantly lower the pressure on the pedal because of the big negative D term now summing with P and the speed will increase more slowly. When the speed is reached, if for some reason your car slows down a little bit, D term will be small enough to allow for a quick speed recovery due to a still big enough P.
Tuning D term means searching a value for the Kd constant high enough to counteract for big reactions due to P, which usually brings big overshoots in temperature, but
low enough that P is not affected too much that the heating becomes too slow.
In Short:
ERROR
is the difference between the SETPOINT (target temperature) and OUTPUT (value read by the thermocouple).
P - PROPORTIONAL TERM
tries to correct the error by applying an influence proportional to the error itself
I - INTEGRAL TERM
detect how error changes over time and tries to counteract steady state differences
D - DERIVATIVE TERM
tries to counteract abrupt changes imposed by the proportional term
P, I and D are then summed together to obtain a numerical value.
That value (let’s call it PID value) is then used to control the heaters via PWM: larger PID values impose the heaters to stay ON for longer
PID tuning is the process of finding the right values for the three terms Kp, Ki, Kd.
An Improved Controller
A lot of reflow ovens, even many industrial ones, can live with just a PID controller for a good reason: they have the
ability to not only add heat but also to remove it.
Toaster ovens can only turn on the heaters and for that reason a PID controller may often become very difficult (if not impossible) to tune properly.
Thermal inertia and hysteresis are your worst enemies. Turning on the heaters make the temperature on the PCB rises only after a period of time and even when you turn off the heaters the temperature on your PCB usually continue to increase with the result of nasty overshoots and burnt components.
To solve the problem we added a few more controls:
Overshoot Compensation
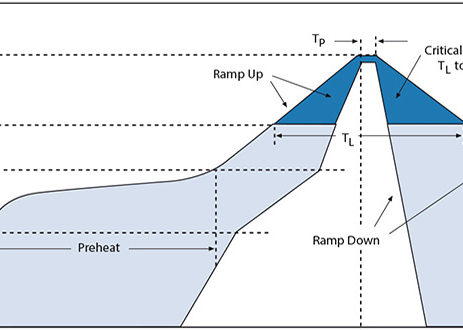
Overshoots in reflow profiles are usually observed in the reflow phase, when your oven is asked to stop rising temperature and maintain it at a steady level for a period of time.
While small overshoots of 2/3°C are usually perfectly ok, if you observe more than 5°C with a standard PID controller you would have to start over the tuning process even if the other phases were perfect.
By using the
overshoot compensation feature you can effectively
change how the PID controller reacts only during the reflow phase by
lowering the target temperature only where it is overshooting.
Previsioning
The practical result of hysteresis is that there is a lag from the ideal target profile and the real curve we can observe as read from the thermocouple.
When the heaters are turned on and off, the temperature on your board will take a few seconds to change proportionally.
This time-shift in the output temperature can be compensated by using the previsioning feature.
By using only a standard PID controller there is no way to compensate for it.
Ki Limit Factor
Since the only steady state to keep in a reflow profile is the short one in the reflow phase,
integral term is usually kept at minimum to improve the system response and to make tuning easier.
Sometimes though, for certain application which requires both
longer phases with a constant temperature AND
steep temperature gradients, tuning may become difficult because you
need higher ki values for the constant phases but those higher values tends to create overshoots when there are changes.
Moreover, since it is not possible to actively take the heat out of the oven
“I” term tends to grows over time to very large values which results in the oven heating even during overshoots.
Ki limit factor is a constant which come to play when an overshoot occurs:
the bigger you set this parameter the faster the value of “I” returns to zero during any overshoot phase.
Please note that this parameter is usually not required for reflow soldering and it should be kept to zero (disabled).
Smooth Radius
This parameter changes the ideal profile by
smoothing the knees around the nodes. It helps preventing lags and overshoots by “
anticipating” what will be required from the next phase.
Preheat Until
This parameter acts at the very beginning of the reflow process. It simply
bypass the PID controller and turn the heaters to a fixed ON until the chosen temperature, effectively converting the controller in an “
open loop” mode. It is useful to
prevent big integral summing and to
quicken the heating at the start.
You should use a value big enough to just reach
the same slope of the first segment before giving control back to the PID.
Fixed Ramp Up
This parameter acts at the beginning of the ramp up in the reflow phase.
PID controller is bypassed and the heaters are turned to a fixed ON for the specified amount of seconds. This is useful to
improve react time of the oven during the most difficult part of the reflow profile.
Please note that this parameter overrides completely both your profile and any overshoot compensation values: if you set it to a value too large your temperature will rise without any control! Before using it with a real reflow process be sure to test it accurately.
PID Tuning your X-toaster Reflow Controller
PID tuning may be a little bit tricky. Before going any further be sure to know and understand:
-
Your oven capabilities, the rate at which it can ramp up
-
What is the profile that you are going to use: temperatures and time intervals between each node.
-
How a PID controller works and how the constant Kp, Ki and Kd will affect the behavior of the oven
Be prepared for a few test runs and
always let the oven cool down to at least 35/40°C before proceeding with another test.
The process of tuning may take
from 30 minutes to a few hours, mostly because you have to let the oven cool down before starting a new test.
Keep a cellphone or a camera at hand and
shoot a photo of the display at the end of every test to keep tracks of your progress.
Always
check the calculated values on the display, they can tell you what to change.
Reference values for the PID parameters are:
Kp: 15~90, it depends on how much your oven is powerful and on how much inertia it has.
Ki: 0.01~1, it can be increased for different purposes apart from reflowing.
Kd: 1/5*Kp ~ 2*Kp, usually higher with powerful heaters and lower for weak ovens.
Your specific oven may require larger or lower values than those specified above.
Remember that changing the value of a constant also change the behavior of the others: the entire controller is dependent upon the values and the correlation between the three.
For reference these are the typical effects of increasing each variable:
Make sure that the profile you are using is compatible with your oven maximum capabilities.
Program the profile in your oven starting from the last node, you won’t be able to set the time one node later in time than the following one.
Once the profile has been programmed save it and enter the advanced options screen.
Let's start...
Let’s start with the “
Preheat Until” parameter.
We are aiming for a value high enough to quickly bring the oven to temperature and to “move” the heaters from their steady state ambient temperature giving them some inertia.
Set this value to 60°C.
The “
Fixed RampUp” parameter will be useful during the most important ramp of the entire reflow process, start with a value of 5s, we will tweak it later.
Ki limit factor is not usually needed for reflowing, set it to zero.
Set the “
Smooth Radius” to 5s, again we can increase it later if needed.
The “
Previsioning” parameter is strongly dependent on the size and internal mass (inertia) of your specific oven. Set it to 7s as a starting point, we will probably increase it later.
Leave “
Overshoot Compensation” to zero, before changing it we need to know if and how much we are overshooting during the reflow phase.
Set
Kp=15,
Ki=0 and
Kd=0
S
ave and start a reflow process with the programmed profile.
The first thing to check is the “
Fixed RampUp “ parameter. You can recognize its influence because the curve is drawn in pink instead of red and, while it is acting, all PID values are MAN (manual).
This parameter should act until
the slope of the output is more or less equal to the slope of the first segment of the profile. If it is too high you will get overshot.
Observe its behavior, abort the session, change the parameter and start again until you obtain what we are looking for.
Now let’s focus on the
PID controller itself.
By now we only enabled P term with a small Kp constant which will probably be too weak.
Increase its value until the red output curve is able to follow the green ideal profile. A few overshoots over the nodes are ok and will be addressed later. If Kp is too low you will observe slow rises and output will mostly be under setpoint. If it is too high there will be oscillations in the output.
If you notice a “shift” in time between the ideal profile and the output you can adjust it by changing (increasing or decreasing) the “
Previsioning” parameter.
Once you have a value for Kp we can try to deal with the overshoots that you probably have.
Let’s change the value of Kd to 1/5*Kp. And start a test session.
Increase Kd until the overshoots are gone.
The effect of increasing Kd is to counteract Kp action when the output is changing very fast. As a result you will probably get a slower response during the preheat phase and the ramp up of the reflow phase. To compensate for it you can increase the “
Preheat Until” and the “
Fixed RampUp” values.
If higher values of Kd are introducing oscillations try increasing Kp again. As always proceed in small steps.
If your output is almost perfect but you are still observing some small overshoots over the nodes and the ramps are too late in respect to the ideal profiles try increasing the value of “
Smooth Radius”.
At this stage you should have a nice output until the reflow zone, where maybe you still have to work with the steep rampup and the overshoot.
If you notice that the ramp is not heating fast enough to reach targeted reflow temperature in time try increasing the “
Fixed RampUp” value. If the temperature is overshooting take note of how much you have to compensate for it and program the “
overshoot compensation” parameter with that value.
We still have to deal with Ki.
As we saw, the integral term of our PID is used for steady state error compensation: since
the only constant temperature in our profile is during the very short peak of the reflow phase you can probably leave Ki to zero and still have a perfectly nice output.
If you observe some kind of oscillation during the constant part of the reflow phase you can improve it by increasing Ki.
Start from a very low value, something around 0.01 and increase it in small steps until the oscillations are gone and the constant temperature is kept nicely.
By increasing Ki you may start to have some new overshoots in your output. If that happens increase again Kd a little bit until they are gone. If the output oscillates tweak again Kp increasing it again in small steps.
When the output satisfy your requirements you are finally ready for your first reflow.
Congratulations!

 All downloadable resources for X-toaster are linked from this page. If you need other documents please contact us.
 PDF files compressed with RAR.
Download it here
PDF files compressed with RAR.
Download it here
 You can use it to quickly make a project of your own chassis. Please note that the model has been designed with a tollerance of approx. +/- 0.5mm
Download it here
You can use it to quickly make a project of your own chassis. Please note that the model has been designed with a tollerance of approx. +/- 0.5mm
Download it here