User interface is provided by the LCD and four leds.
Leds, from left to right:
| Orange |
Mostly red when on. Power on, shows that the board is powered. |
| Blue |
Status Led. Used for various pourposes, it is usually on when there are problems with temperatures and when a reflow process is running. |
| Green |
On when FAN CTRL is on |
| Dark Orange |
On when HEATERS CTRL is on |
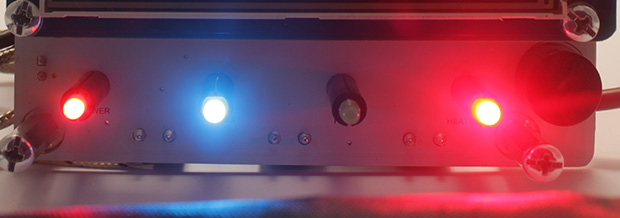
Please note that all the leds has been polarized to have mostly the same light intensity except for the SSR HEATER which is a little bit brighter (electricity is flowing, heat is generated)
On the LCD you can navigate through the menu with the touchscreen:
Main Menu
From here you can check the oven’s temperature as read from the thermocouple, the onboard temperature sensor readings and how much time passed since the board was powered.
Three red buttons on the left will start the respective reflow sessions, while three blue buttons on the right allows the user to reprogram the profiles with their names and their advanced parameters.
The purple button will allow to change general system settings and the grey one is used to overview some system info and all three temperature sensors.
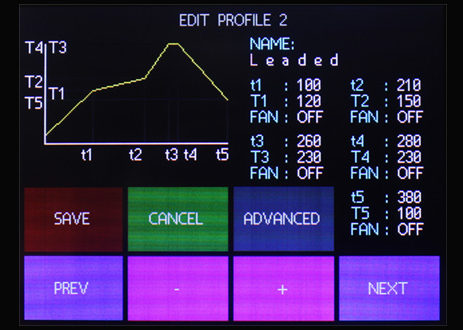
Setup Reflow Profile
Each profile has
five time nodes arranged in this way (t0 is the moment in which the reflow profile is started, for t0 temperature is automatically read from the oven):
t0-t1: PREHEAT PHASE
t1-t2: SOAK PHASE
t2-t3: RAMP-UP PHASE
t3-t4: REFLOW PHASE
t4-t5: COOLDOWN PHASE
Each of these five nodes can be programmed with the desired time/temperature and for each of these phases you can sepcify if the oven’s fan has to be turned ON or OFF.
You can move between the options using the “
PREV” and “
NEXT” buttons, values are changed with the “
+” and “
-“ buttons.
The
graph drawn on the top-left corner shows a visual
preview of the profile you are programming and is
refreshed whenever a change is made or when you touch it.
When you are satisfied with your profile you can save it to EEPROM by pressing the “
SAVE” button which will bring you back to the main menu or you can press the “
ADVANCED” button to save it and enter another page in which you can modify the advanced parameters for that profile.
Advanced Reflow Parameters
Preheat Until
Used to
keep the oven ON from the start of the reflow session, discarding any PID result, until a certain temperature is reached. This may be useful to avoid big Ki summing due to starting inertia and to speed up initial heating. When set to 0 this control is disabled.
Fixed RampUp
Like the “Preheat Until” parameter this control allows to
keep the oven ON during the RAMP UP phase but, instead of a temperature you can specify
for how many seconds you want to discard PID results. This may be useful if you needed to use big Kd values to limit overshoots but you need to quickly heat up the oven to reach reflow temperature. This control is disabled when set to 0.
Ki limit factor
This parameters
starts acting when there are overshoots, lowering Ki at a faster rate than normal. Disabled when set to 0.
Smooth Radius
Since your reflow curve is going to be 5 segments delimited by the nodes, the “steepness” of the knees may result in overshoot and/or undershoot.
This parameter helps in smoothing your profile by drawing another segment which replaces the knees around the nodes for the programmed seconds. When set to 0 this control is disabled.
Previsioning
A big problem with toaster ovens is their large thermal inertia which leads to time lags of the output. If you can observe this kind of behavior by changing this parameter you can effectively
shift your real observed curve ahead or later in time in respect to the target ideal profile. For larger oven this parameter give good result with values of 10~18, smaller oven having lower inertia may be ok with a value of 2~10. A little bit of testing is necessary to fine tune it. This control is disabled when set to 0.
Overshoot Compensation
Like the Previsioning Parameter, Overshoot Compensation allows to
compensate for thermal inertia in the REFLOW PHASE where usually there is a target temperature to keep and maintain for a given time. This problem is also known as Thermal Hysteresis: your profile is almost perfect but when it has to settle at a temperature it constantly overshot by a few degrees.
Set this parameters exactly equal to the overshoot you are observing to compensate for it. This parameter is disabled if set to 0.
PID-Kp
The
proportional constant of the PID controller
PID-Ki
The
integral constant of the PID controller
PID-Kd
The
derivative constant of the PID controller
System Settings
DEFAULT SETTINGS – Restore all system preferences to defaults
DEFAULT PROFILES – Restore all profiles nodes and parameters to defaults
These are the parameters you can customize in the System Settings Page:
Timeout
How many minutes before the system enters standby/shutdown and the user is asked to take actions
Int Sen MAX T
Maximum temperature reading allowed from the onboard sensor before firing a Temperature Alarm and the user is askedto take actions.
Ext Sen MAX T
Same as Internal, but for the external sensor
Oven MAX T
Same as onboard and external sensor but related to temperature read from the thermocouple.
Buzzer Volume
increase or decrease buzzer volume
Offset Temperature
Thermocouple reading error is not linear over the entire temperature range, but if you can observe a fixed offset in respect to other sensors you can adjust it from here. It can be set both with negative or positive values.
Draw Real Curves
If, during reflow sessions, you want to display both the ideal curve (only defined by nodes), and the
ideal curve modified by advanced parameters (except previsioning), by setting this value to YES you will see the ideal green curve, a modified yellow curve and the real measured values in red.
System Info
The "System Info" page will show you some information about the connected DS18BXX sensors and the stored parameters for the touch screen calibration.
By pressing the "Recalibrate" button you will enter a page with a 5 points recalibration routine.
If, for some reason, you mess up with the recalibration parameters and you are no longer able to enter this page you can shut down the board, touch the screen and keep pressing while the controller is powered up. It will automatically enter the recalibration page.
Start Reflow
Reflow page is mostly occupied by the time/temperature graph in which you can confront the
target ideal temperature (green) and the
measured temperature from the thermocouple (red).
You can also check the numerical values in the bottom left of the screen where in green you can read the ideal target temperature (calculated against the advanced parameters) and in red the measured temperature.
The second grey square at the bottom left shows the internal and external temperature sensors values.
On the third grey square, as a reference, saved PID constant are shown.
The bigger red square stops the reflow process if needed.
On the top left you can read the custom profile name,
in the center the calculated PID parameter and at right time in seconds from the start of the process.
Calculated PID values are a must when tuning your controller:
by visualizing them you can see which one needs to be lowered or increased.
During COOLDOWN phase the controller will ask to open the oven’s door.

 From here you can check the oven’s temperature as read from the thermocouple, the onboard temperature sensor readings and how much time passed since the board was powered.
Three red buttons on the left will start the respective reflow sessions, while three blue buttons on the right allows the user to reprogram the profiles with their names and their advanced parameters.
The purple button will allow to change general system settings and the grey one is used to overview some system info and all three temperature sensors.
From here you can check the oven’s temperature as read from the thermocouple, the onboard temperature sensor readings and how much time passed since the board was powered.
Three red buttons on the left will start the respective reflow sessions, while three blue buttons on the right allows the user to reprogram the profiles with their names and their advanced parameters.
The purple button will allow to change general system settings and the grey one is used to overview some system info and all three temperature sensors.
 Each profile has five time nodes arranged in this way (t0 is the moment in which the reflow profile is started, for t0 temperature is automatically read from the oven):
t0-t1: PREHEAT PHASE
t1-t2: SOAK PHASE
t2-t3: RAMP-UP PHASE
t3-t4: REFLOW PHASE
t4-t5: COOLDOWN PHASE
Each of these five nodes can be programmed with the desired time/temperature and for each of these phases you can sepcify if the oven’s fan has to be turned ON or OFF.
You can move between the options using the “PREV” and “NEXT” buttons, values are changed with the “+” and “-“ buttons.
The graph drawn on the top-left corner shows a visual preview of the profile you are programming and is refreshed whenever a change is made or when you touch it.
When you are satisfied with your profile you can save it to EEPROM by pressing the “SAVE” button which will bring you back to the main menu or you can press the “ADVANCED” button to save it and enter another page in which you can modify the advanced parameters for that profile.
Each profile has five time nodes arranged in this way (t0 is the moment in which the reflow profile is started, for t0 temperature is automatically read from the oven):
t0-t1: PREHEAT PHASE
t1-t2: SOAK PHASE
t2-t3: RAMP-UP PHASE
t3-t4: REFLOW PHASE
t4-t5: COOLDOWN PHASE
Each of these five nodes can be programmed with the desired time/temperature and for each of these phases you can sepcify if the oven’s fan has to be turned ON or OFF.
You can move between the options using the “PREV” and “NEXT” buttons, values are changed with the “+” and “-“ buttons.
The graph drawn on the top-left corner shows a visual preview of the profile you are programming and is refreshed whenever a change is made or when you touch it.
When you are satisfied with your profile you can save it to EEPROM by pressing the “SAVE” button which will bring you back to the main menu or you can press the “ADVANCED” button to save it and enter another page in which you can modify the advanced parameters for that profile.

 DEFAULT SETTINGS – Restore all system preferences to defaults
DEFAULT PROFILES – Restore all profiles nodes and parameters to defaults
These are the parameters you can customize in the System Settings Page:
DEFAULT SETTINGS – Restore all system preferences to defaults
DEFAULT PROFILES – Restore all profiles nodes and parameters to defaults
These are the parameters you can customize in the System Settings Page:
 Reflow page is mostly occupied by the time/temperature graph in which you can confront the target ideal temperature (green) and the measured temperature from the thermocouple (red).
You can also check the numerical values in the bottom left of the screen where in green you can read the ideal target temperature (calculated against the advanced parameters) and in red the measured temperature.
The second grey square at the bottom left shows the internal and external temperature sensors values.
On the third grey square, as a reference, saved PID constant are shown.
The bigger red square stops the reflow process if needed.
On the top left you can read the custom profile name, in the center the calculated PID parameter and at right time in seconds from the start of the process.
Calculated PID values are a must when tuning your controller: by visualizing them you can see which one needs to be lowered or increased.
During COOLDOWN phase the controller will ask to open the oven’s door.
Reflow page is mostly occupied by the time/temperature graph in which you can confront the target ideal temperature (green) and the measured temperature from the thermocouple (red).
You can also check the numerical values in the bottom left of the screen where in green you can read the ideal target temperature (calculated against the advanced parameters) and in red the measured temperature.
The second grey square at the bottom left shows the internal and external temperature sensors values.
On the third grey square, as a reference, saved PID constant are shown.
The bigger red square stops the reflow process if needed.
On the top left you can read the custom profile name, in the center the calculated PID parameter and at right time in seconds from the start of the process.
Calculated PID values are a must when tuning your controller: by visualizing them you can see which one needs to be lowered or increased.
During COOLDOWN phase the controller will ask to open the oven’s door.