Safety Notes
[box type="warning"]Please understand that, while X-toaster is a low voltage device and no high voltage source should be connected directly to the board, to build a reflow oven you will have to deal with mains power and connections.
Mounting and using the controller involves two deadly hazards: fire and electrocution.
X-toaster is not an end user product. Instead, it is a component which should be used to build a finished device (a toaster reflow oven). As such it is intended that you are a well trained electrical engineer who knows how to deal with mains power and industrial devices and production.
Do not take the chance of risking your life: if you do not know what you are doing or if you are not sure about something seek for the advice of an expert technician in your area. If this is not possible please do not use this board.[/box]
Consider an External Enclosure
Toaster ovens are not designed to be modded for reflowing.
While it could be possible to fit the board directly into the oven’s chassis
we strongly advise you to consider buying or building an external dedicated enclosure.
There are three good reason for this:
1) Temperatures inside the oven could become too high (above 50°C) and the board may be damaged by repetitive exposures to such temperatures. In fact, all electrical connections inside an oven are made with high temperature resistant wires. If you decide to mount the board inside the oven you should always use high temperature wires and you should find a way to insulate the board from the heat generated.
2) Apart from the board itself, you will have to mount at least an SSR with its heatsink and a power supply. Usually there is not enough space inside a chassis to mount all these boards and components AND the insulation WHILE keeping all the installation clean and safe with a sufficient air flow.
3) With such a small area inside the oven chassis it would be difficult to keep the right and safe distances from high voltages boards and wires and the low voltage controller part. As always think about safety first and try to imagine worst event that could happen, like an high voltage wires disconnected which come in contact with the controller board.
If you are still willing to mount the controller inside the oven, you should at least
use the onboard temperature sensor to ensure that the maximum temperature of 70°C is never reached (check “User Interface”). Even so, keep in mind that your board life will be considerably reduced.
A slightly better option would be to
install the SSR inside the oven and the controller in an external enclosure.
Even when you do so, remember that the SSR we are supplying in our kit is rated for a maximum operation of 80°C, to keep it to a safe temperature you should
use an external sensor (connecting it to the “EXT SENSOR”) and position it in firm contact with the SSR heatsink using some fastener to secure it in place and maybe some heat transfer compound. You should set the maximum temperature using the user interface to a maximum of 60°C/65°C.
Suggested Enclosure and Dimensions
In another article
you can find the layout for a front panel.
You can use that drawing to drill holes and cut the LCD opening in the right position of your front panel. That drawing also indicates the minimum internal width and height of an enclosure to be able to accommodate the controller.
The minimum internal depth of the enclosure depends on which other boards and components you are going to fit inside it.
If you are going to use an external 5V power supply (a wall cube) and you are going to mount the SSR inside the oven, the depth of the external enclosure can be kept to a minimum of 50mm/60mm.
Of course having many smaller enclosures and devices around may not be practical so you would want to use a bigger housing and to mount everything inside it.
Whichever solution you are going to adopt, keep in mind these basic rules:
1) Use the right wire gauge and type for your connections, especially those involved in high voltage. Know how much power your oven is going to absorb and dimension your wires accordingly.
2) Keep your connections short enough to reduce EMI and power dissipation but long enough to create comfortable connections.
3) Use plastic strips to tie cable together in firm but unstrained positions.
4) Always provide for some kind of strain relief mounting to cables going out your enclosures.
5) For mains power and for all cables mounted inside the oven always use crimped connectors, never use soldered connectors.
6) Be sure to always connect to earth all metal parts involved in your enclosures and always double check those connections. These are your lifesaver when something go wrong: check them again!
7) if you can, use a metal housing (connected to earth). They are fire-safe, stronger than plastic and wood and provide better shielding and better heat dissipation.
8) make sure that all bolts and screws involved in your assembly are tight but not overtight.
9) always use a multimeter and check your connections as you go through the assembly and before connecting any power source.
10) inside the oven use only high temperature cables.
11) you should always identify high voltages area inside an enclosure and isolate them as much as possible from low voltage wires and boards. Never tie together wires of different voltages and never position an high voltage board (like a power supply) near a low voltage board (like the X-toaster controller)
Electrical Connections
In the kit you will find the right female connector which mates with the onboard male. Please note that it is a polarized connection and, even if the board is protected against inverted power, you should
check the polarity of your power supply and connect it accordingly.
To test the board you will also have to connect the thermocouple otherwise an “Hardware Error” will be fired.
The thermocouple is a k type probe and it also have a polarization which you have to respect. Usually the blu wire goes in the “-“ and the red wire is to be connected to the “+” side.
The
HEATERS CTRL and FAN CTRL connectors should be connected respecting the polarity of your SSR: “-“ with “-“ and “+” with “+”.
For a standard installation the PDI connector should remain unconnected.
The
EXT SENSOR has 3 pins:
D (data), V (Vcc) and G (GND). You can use any
DS18XX sensor or probe, you just have to respect the polarity indicated on the board.
The SSR should be mounted on top of the heatsink using screws and the supplied compound.
Note that the SSR "cuts" the brown wire which is the PHASE. The blu wire (NEUTRAL) should be connected straight to the oven.
To crimp connectors to wires you should use a proper crimping tool. Avoid the use of pliers.
Thermocouple Positioning

If you decided to use an unmodded oven the only way to put the thermocouple inside the oven is through the main door.
Make sure that the door remain as closed as possible but do not force it to avoid any damage to the sensor wire.
The supplied thermocouple is not grounded, it is not possible to use grounded thermocouples with X-toaster.
You can decide to position the thermocouple in free air or to attach it to a test board.
We suggest you to mount the thermocuple in free air: this is the most common situation and it allows to directly use the profiles suggested in the datasheets of the electronic components on your board.
If you need a very precise temperature reading you can use a test pcb similar in size and copper surface to the ones being soldered. The tip of the probe should be positioned inside a grounded via or a small plated hole of another test board, and secured with some kepton tape. You may also want to use a little bit of heatsink compound placed on the tip to ensure an optimal thermal conductivity.


 You do not have to mod your oven to be able to reflow your board.
If you can turn on your oven from the knobs and set it to “always on” at maximum power, you can simply use the supplied power cord to connect the oven to the SSR and, in turn, to the controller. This is the simpler, safer and quicker method.
If you do not have a good reason to start unscrewing the oven you should leave it “as is”.
At least, before opening the oven and start modding it, you should try to make a couple of test to see if the oven needs some modding and to understand which kind of modding would be beneficial for you.
By modding your oven you could:
- add more heaters to improve ramp up speed and reduce cold spots.
- add insulation to improve ramp up speed and to easily maintain a steady temperature.
- drill an hole to the side or the back for the thermocouple
- connect the heaters directly to the SSR bypassing any mounted thermostat and timer
- reduce internal volume to reduce thermal inertia
- consider adding a convection fan if not already present
- adjust the tray height and possibly modify the tray itself with spacers or a steal grill to avoid cold spots on the PCB
You do not have to mod your oven to be able to reflow your board.
If you can turn on your oven from the knobs and set it to “always on” at maximum power, you can simply use the supplied power cord to connect the oven to the SSR and, in turn, to the controller. This is the simpler, safer and quicker method.
If you do not have a good reason to start unscrewing the oven you should leave it “as is”.
At least, before opening the oven and start modding it, you should try to make a couple of test to see if the oven needs some modding and to understand which kind of modding would be beneficial for you.
By modding your oven you could:
- add more heaters to improve ramp up speed and reduce cold spots.
- add insulation to improve ramp up speed and to easily maintain a steady temperature.
- drill an hole to the side or the back for the thermocouple
- connect the heaters directly to the SSR bypassing any mounted thermostat and timer
- reduce internal volume to reduce thermal inertia
- consider adding a convection fan if not already present
- adjust the tray height and possibly modify the tray itself with spacers or a steal grill to avoid cold spots on the PCB
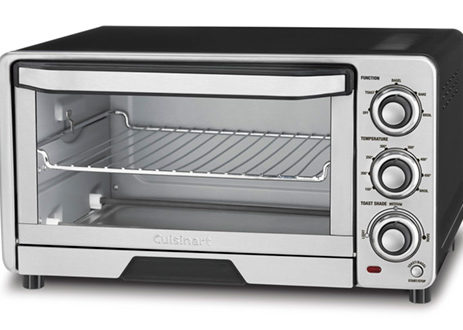
 Avoid the new electronics controlled oven with cool displays and touch buttons.
You are not going to use those controls and you can save some money by getting a basic one with only manual controls.
If do not plan to open and modify internally the oven make sure that you can turn it always on with the supplied knobs. If you want to reflow with lead-free solder paste there is the possibility that the thermostat of the oven will shut it down before the temperature you need to reach. If this happens, you will have no other choice than open the oven and bypass the thermostat control knob.
Avoid the new electronics controlled oven with cool displays and touch buttons.
You are not going to use those controls and you can save some money by getting a basic one with only manual controls.
If do not plan to open and modify internally the oven make sure that you can turn it always on with the supplied knobs. If you want to reflow with lead-free solder paste there is the possibility that the thermostat of the oven will shut it down before the temperature you need to reach. If this happens, you will have no other choice than open the oven and bypass the thermostat control knob.
 As a general rule, keep in mind that, since larger ovens have more mass, they tend to heat and cool down slower than the smaller ones. In other words they have much more “thermal inertia” which is ok for cooking but definitely you want to minimize it for reflow soldering.
Because of that, you may want to start searching for the smaller oven with the highest power rating you can find in the market. Something around 1500W for a small oven is almost perfect.
If you really need to use a larger oven you should consider modding it to add some more heating elements but before doing any modification check for your power outlets power rating.
If you live in a country where the outlets have a standard rating of 110V/120V@15A you can’t draw more than 1500W and you cannot modify your oven unless you ask your energy supplier to install a 220V/230V power line.
As a general rule, keep in mind that, since larger ovens have more mass, they tend to heat and cool down slower than the smaller ones. In other words they have much more “thermal inertia” which is ok for cooking but definitely you want to minimize it for reflow soldering.
Because of that, you may want to start searching for the smaller oven with the highest power rating you can find in the market. Something around 1500W for a small oven is almost perfect.
If you really need to use a larger oven you should consider modding it to add some more heating elements but before doing any modification check for your power outlets power rating.
If you live in a country where the outlets have a standard rating of 110V/120V@15A you can’t draw more than 1500W and you cannot modify your oven unless you ask your energy supplier to install a 220V/230V power line.
 A circulating air fan is not needed but it may help to improve heat consistency across your PCB.
Industrial reflow ovens basically work by convection. They are designed to minimize radiated energy from the heaters and to use only hot air to transfer heat to the PCB with one or more fans which not only keeps the temperature gradient in the oven to a minimum but also draw the hot air out when there are overshoots and during cooldown phase.
A toaster oven on the other hand works basically with radiated energy from the heaters and the small fans they usually come from are often not adequate to ensure a minimum heat gradient. In our tests, we found that sometimes they can help but, depending on the oven and the fan itself, they may cause problem during the liquidus phase. Sometimes they have strong vibrations and sometimes they spin too fast with too much airflow on small areas. Both of these problems usually results in the smaller components being moved out of their places.
The only way to know if your oven’s fan is ok is to actually try it.
For small PCB with small components you should be ok with the fan OFF. If you have bigger components you can try to turn on the fan during the entire reflow process.
If your board has a mix of bigger and smaller components you can try to turn on the fan only during PREHEAT and SOAK.
Also keep in mind that turning on the fan usually results in an increase of thermal inertia and tuning your profile may become somewhat harder and, if you plan to use an oven without having to open and modify it internally, there is no way to externally control the fan which is usually always on.
A circulating air fan is not needed but it may help to improve heat consistency across your PCB.
Industrial reflow ovens basically work by convection. They are designed to minimize radiated energy from the heaters and to use only hot air to transfer heat to the PCB with one or more fans which not only keeps the temperature gradient in the oven to a minimum but also draw the hot air out when there are overshoots and during cooldown phase.
A toaster oven on the other hand works basically with radiated energy from the heaters and the small fans they usually come from are often not adequate to ensure a minimum heat gradient. In our tests, we found that sometimes they can help but, depending on the oven and the fan itself, they may cause problem during the liquidus phase. Sometimes they have strong vibrations and sometimes they spin too fast with too much airflow on small areas. Both of these problems usually results in the smaller components being moved out of their places.
The only way to know if your oven’s fan is ok is to actually try it.
For small PCB with small components you should be ok with the fan OFF. If you have bigger components you can try to turn on the fan during the entire reflow process.
If your board has a mix of bigger and smaller components you can try to turn on the fan only during PREHEAT and SOAK.
Also keep in mind that turning on the fan usually results in an increase of thermal inertia and tuning your profile may become somewhat harder and, if you plan to use an oven without having to open and modify it internally, there is no way to externally control the fan which is usually always on.
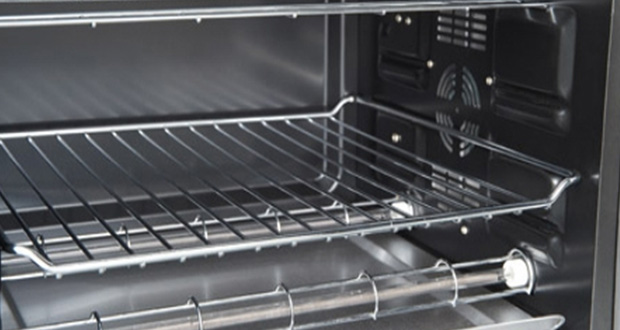
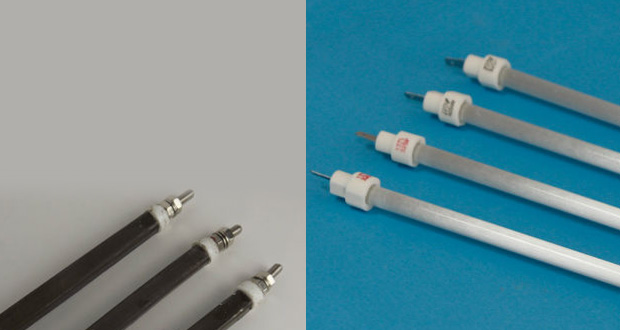 There are two kind of heaters usually mounted inside a toaster oven: the classic ceramic heaters (the ones you find inside your big kitchen oven) and the newer quartz heaters.
While both of them can do the job of rising temperature high enough for reflowing, quartz elements tends to heat up and cool down faster.
This will improve the response of the oven to your reflow profile so, if you can, get an oven with quartz elements.
The position of the heaters in the oven is also important. If you have only one heater on the top and one at the bottom you will probably have a few problem with larger boards with some hot spot directly under the heating elements and a few cold spot in the farther locations.
Ideally there should be at least two elements on the top and two at the bottom.
If you have to decide, it is better to have two heaters on the top and none at the bottom. This will drastically improve heat distribution but could also lead to warped boards for larger PCB (more than 10cmx10cm). Try to choose an oven which is adequate to the boards you are going to reflow.
There are two kind of heaters usually mounted inside a toaster oven: the classic ceramic heaters (the ones you find inside your big kitchen oven) and the newer quartz heaters.
While both of them can do the job of rising temperature high enough for reflowing, quartz elements tends to heat up and cool down faster.
This will improve the response of the oven to your reflow profile so, if you can, get an oven with quartz elements.
The position of the heaters in the oven is also important. If you have only one heater on the top and one at the bottom you will probably have a few problem with larger boards with some hot spot directly under the heating elements and a few cold spot in the farther locations.
Ideally there should be at least two elements on the top and two at the bottom.
If you have to decide, it is better to have two heaters on the top and none at the bottom. This will drastically improve heat distribution but could also lead to warped boards for larger PCB (more than 10cmx10cm). Try to choose an oven which is adequate to the boards you are going to reflow.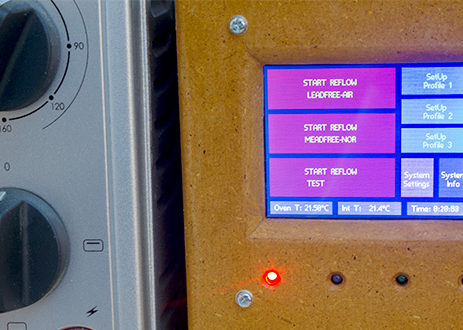
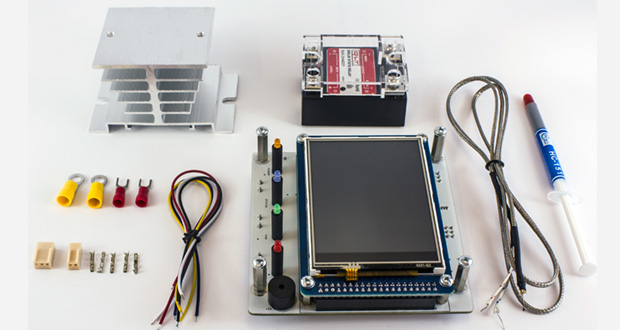
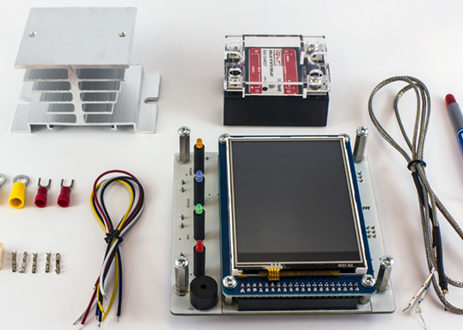
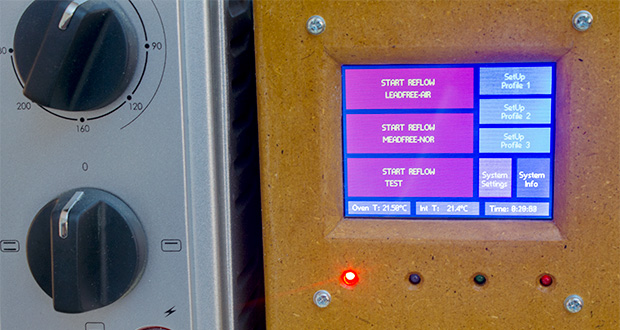 X-toaster has been designed to nicely fit in an enclosure with an inner width of about 100mm and it comes with a set of mounting spacer bolts which allows the LCD and the LEDs to sit at the right height when mounted on a front panel.
Mounting holes and LEDs have been positioned around the LCD’s viewing area to provide a symmetrical appearance from the outside of the front panel. For this reason the board will be in an eccentric position when mounted in the chassis.
X-toaster has been designed to nicely fit in an enclosure with an inner width of about 100mm and it comes with a set of mounting spacer bolts which allows the LCD and the LEDs to sit at the right height when mounted on a front panel.
Mounting holes and LEDs have been positioned around the LCD’s viewing area to provide a symmetrical appearance from the outside of the front panel. For this reason the board will be in an eccentric position when mounted in the chassis.